


Why a rechargeable digital caliper is still a shop-floor staple
A GODESON Digital Caliper sits in a very familiar part of the tool drawer: not glamorous, but essential when a part has to fit, slide, register, or simply be checked before it goes downstream. For machinists, maintenance techs, woodworkers, and product teams reviewing prototypes, the appeal is straightforward. You get a direct digital readout, the ability to switch between metric and imperial units, and a tool that can handle the basic dimensional checks that come up all day long.
What makes this type of caliper worth a second look is not novelty. It is convenience, repeatability, and speed. A rechargeable electronic caliper removes one of the common small annoyances of battery-powered tools, and the IP54 marking visible on the display suggests a degree of protection against dust and light splash exposure. That does not make it a rough-use instrument, but it does make it easier to imagine on a busy bench where the environment is not perfectly clean.
If you are deciding whether a digital caliper like this belongs in your workflow, the real question is less about features and more about fit: does the tool offer the range, readout style, and day-to-day usability your team actually needs?
What the product is designed to do
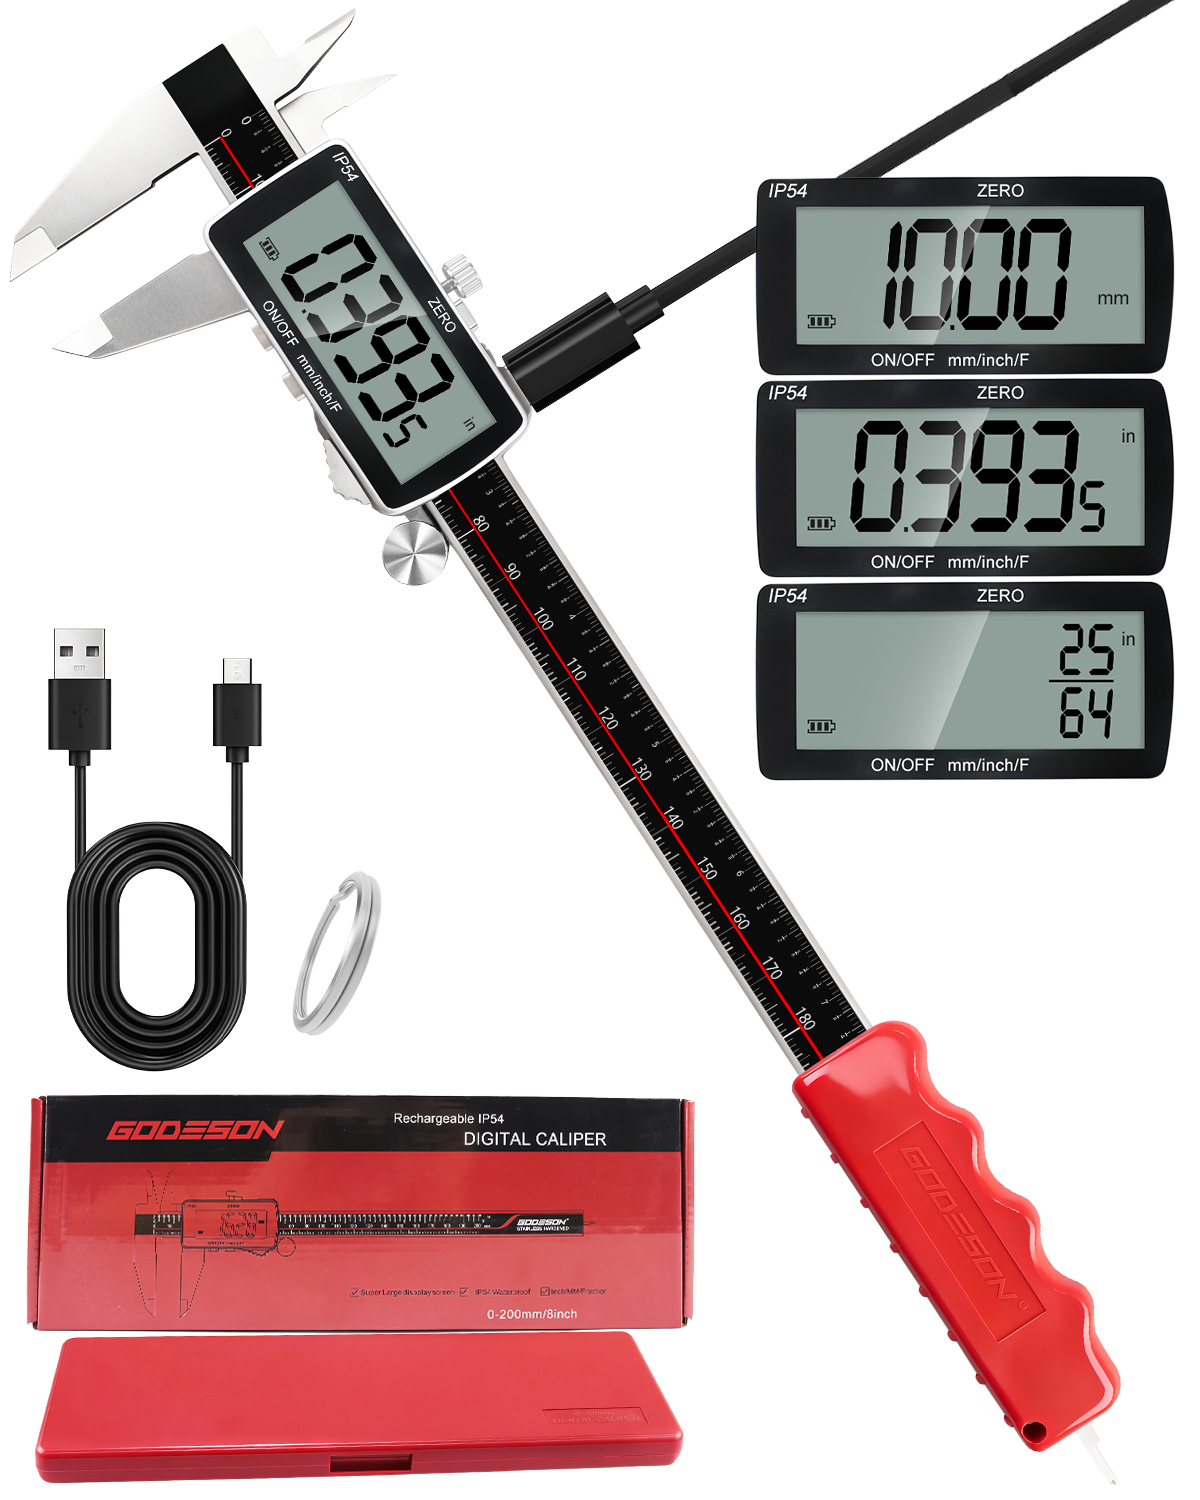
The visible construction is the classic digital caliper format. A stainless steel-looking measuring beam forms the backbone of the tool, with an engraved scale for reference and a sliding electronic housing carrying the LCD screen. The jaws are extended enough for common external and internal measurements, and the depth rod gives you a way to check recesses, slots, and blind features. That covers the core use cases most buyers expect from this category.
The product box indicates a measurement range of 0–200 mm / 8 inch. That is the standard size many users reach for first, because it is large enough for general parts work without becoming awkward in the hand. The screen can display mm, inch, and fractional inch formats, which is useful when a shop is mixed between metric drawings and imperial legacy parts. That alone can save a surprising amount of time at the bench.
There is also a thumb wheel or fine-adjustment control near the display, along with a locking-style feature in the housing area. Those details matter more than they look on a product photo. A caliper that moves smoothly and stays put when you need to read it tends to be used more often, and used more confidently.
Quick-reference view: where this caliper fits best
For readers comparing options quickly, this style of rechargeable digital caliper is a practical choice for:
Machine shops checking outside diameters, hole sizes, and part depth.
Fabrication benches where quick verification matters more than laboratory-level metrology.
Woodworking and cabinet work, especially when metric/imperial switching is frequent.
Maintenance and repair tasks where parts are removed, inspected, and reinstalled.
Hobby machining and prototyping, where a clean digital readout reduces mistakes.
It is not the tool for every measurement problem. If you need tight traceable calibration, highly controlled lab conditions, or specialized inspection protocols, a standard digital caliper is only one piece of the system. But for fast dimensional checks, it remains one of the most useful hand tools in the shop.
Notable visible features that matter to buyers
The first feature most users will notice is the LCD screen. Large numerals are a practical advantage, especially in older shops or on cluttered benches where operators do not want to angle the tool back and forth to catch the reading. The display housing is black, with a red plastic grip section that gives the tool a clearer hand position and a slightly more secure feel.
The rechargeability is another point worth highlighting. The included USB-A to Micro-USB cable indicates a rechargeable design rather than disposable batteries. In a procurement context, that means one less consumable to track, and in daily use it means fewer interruptions when the battery gets low. Of course, the real value depends on charging behavior over time, but the basic idea is appealing for tools that sit in regular rotation.
The IP54 marking on the display should be read carefully. It is a useful signal, but not a blank check. In practical terms, it suggests some protection against dust ingress and light splashing, which is helpful in workshop settings. It does not mean the caliper should be treated like a washdown instrument or left exposed to coolant spray. A little caution still goes a long way with electronic measuring tools.
A small ring or loop accessory is also shown, along with a protective storage case or box. That may seem minor, but storage matters with calipers. A measuring tool can drift out of usefulness faster than people expect if it is tossed into a drawer with screwdrivers, chips, and other metal parts. A case is a simple habit that helps preserve both the beam and the display housing.
How users typically apply this type of caliper
External measurements
Outside diameter, thickness, and width checks are the bread and butter of a digital caliper. The flat contact surfaces on the jaws make it suitable for verifying stock dimensions, turned parts, plates, and housings. In many workflows, this is the measurement done most often and the one most likely to justify a digital readout over an analog scale.
Internal measurements
Internal jaw use is common for checking slot widths, bore diameters, and recesses. The important practical point is technique. A caliper can give a useful reading here, but it still depends on operator feel. Buyers sometimes expect a digital display to solve technique problems; it does not. The display only reports what the jaws are doing.
Depth and step checks
The depth rod is easy to overlook until the first time it saves a part from being scrapped. Depth measurements, counterbores, and step features are routine in machining and product assembly. This is one reason a caliper remains a frontline tool even in shops that own far more sophisticated inspection equipment.
Selection criteria that matter more than the headline features
When comparing a rechargeable digital caliper with other tools in the same category, buyers usually care about a few concrete things.
First is the feel of the slide. If the beam has rough spots or uneven resistance, the tool becomes annoying quickly. A caliper should move smoothly without feeling loose. Second is readability. The display should be easy to read under normal shop lighting, not just in a staged product photo. Third is unit switching. If a team regularly toggles between mm and inch, that function should be obvious and fast, not buried in a fiddly sequence that slows the operator down.
Durability is the harder one to judge from appearance alone. The visible metal beam and jaws are reassuring, but the long-term life of a digital caliper depends just as much on the housing, seals, contacts, and charging interface. That is where buyers should be practical rather than optimistic. A protected electronic tool still benefits from careful handling, a clean wipe-down, and proper storage.
Common mistakes buyers make with digital calipers
One mistake is treating a digital caliper as if the screen guarantees accuracy on its own. It does not. Jaw alignment, cleanliness, and zero-setting habits all matter. Chips on the beam or grime on the contact surfaces can affect readings more than users like to admit.
Another mistake is assuming that IP54 means the tool can live in an oily, wet, or abrasive environment without complaint. It is better than no protection, but it is not a license for abuse. If the tool is being used around coolant, abrasive dust, or heavy moisture, storage discipline becomes part of the purchase decision.
A third issue is buying only for the range. Yes, 0–200 mm / 8 inch is the standard size for many applications, but range alone does not determine usefulness. The real test is whether the tool feels comfortable in the hand, reads clearly, and matches the units and measuring style your team uses every day.
Practical buying advice for engineers and sourcing teams
If you are evaluating this product for a bench, a small production line, or a toolkit purchase, start with the actual use case. For general dimensional checking, the feature set is sensible: rechargeable power, digital display, multiple unit modes, and a familiar 200 mm format. For a mixed-environment shop, the IP54 marking is a useful but modest advantage.
From a sourcing perspective, it is worth confirming the details that are not visible in the photo set. Accuracy, resolution, calibration approach, and battery performance are all relevant, but they should be verified from product documentation or supplier data rather than guessed from appearance. The same caution applies to any extra functions hinted at by the bezel markings. If a feature is not clearly documented, do not build a buying decision around it.
For product teams, the main value of this style of caliper is usability. It offers a familiar workflow with fewer battery hassles. That is often enough for internal inspection, receiving checks, and prototype work where speed matters and the measurement task is straightforward.
FAQ
Is this caliper only for metric work?
No. The visible display supports mm, inch, and fractional inch formats, which makes it useful in mixed-unit environments.
Can it measure depth and internal dimensions?
Yes, that is part of the standard caliper function set. The jaws and depth rod are designed for external, internal, depth, and step measurements.
Is the IP54 marking enough for wet shops?
It indicates a useful level of protection, but it should not be treated as a guarantee for harsh wet or coolant-heavy conditions. Reasonable care still applies.
What should buyers verify before ordering?
Confirm the measurement range, unit modes, charging method, storage case inclusion, and any published performance specifications such as accuracy or resolution.
A sensible next step
If your team needs a straightforward rechargeable caliper for everyday dimensional checks, this model deserves consideration on usability alone. Review the supplier’s specifications, confirm the details that matter to your process, and compare it against the kind of work your operators actually do. A good caliper does not need to be complicated; it just needs to read cleanly, travel smoothly, and survive normal shop handling without becoming a nuisance.





