


Why a Digital Caliper Still Matters on the Shop Floor
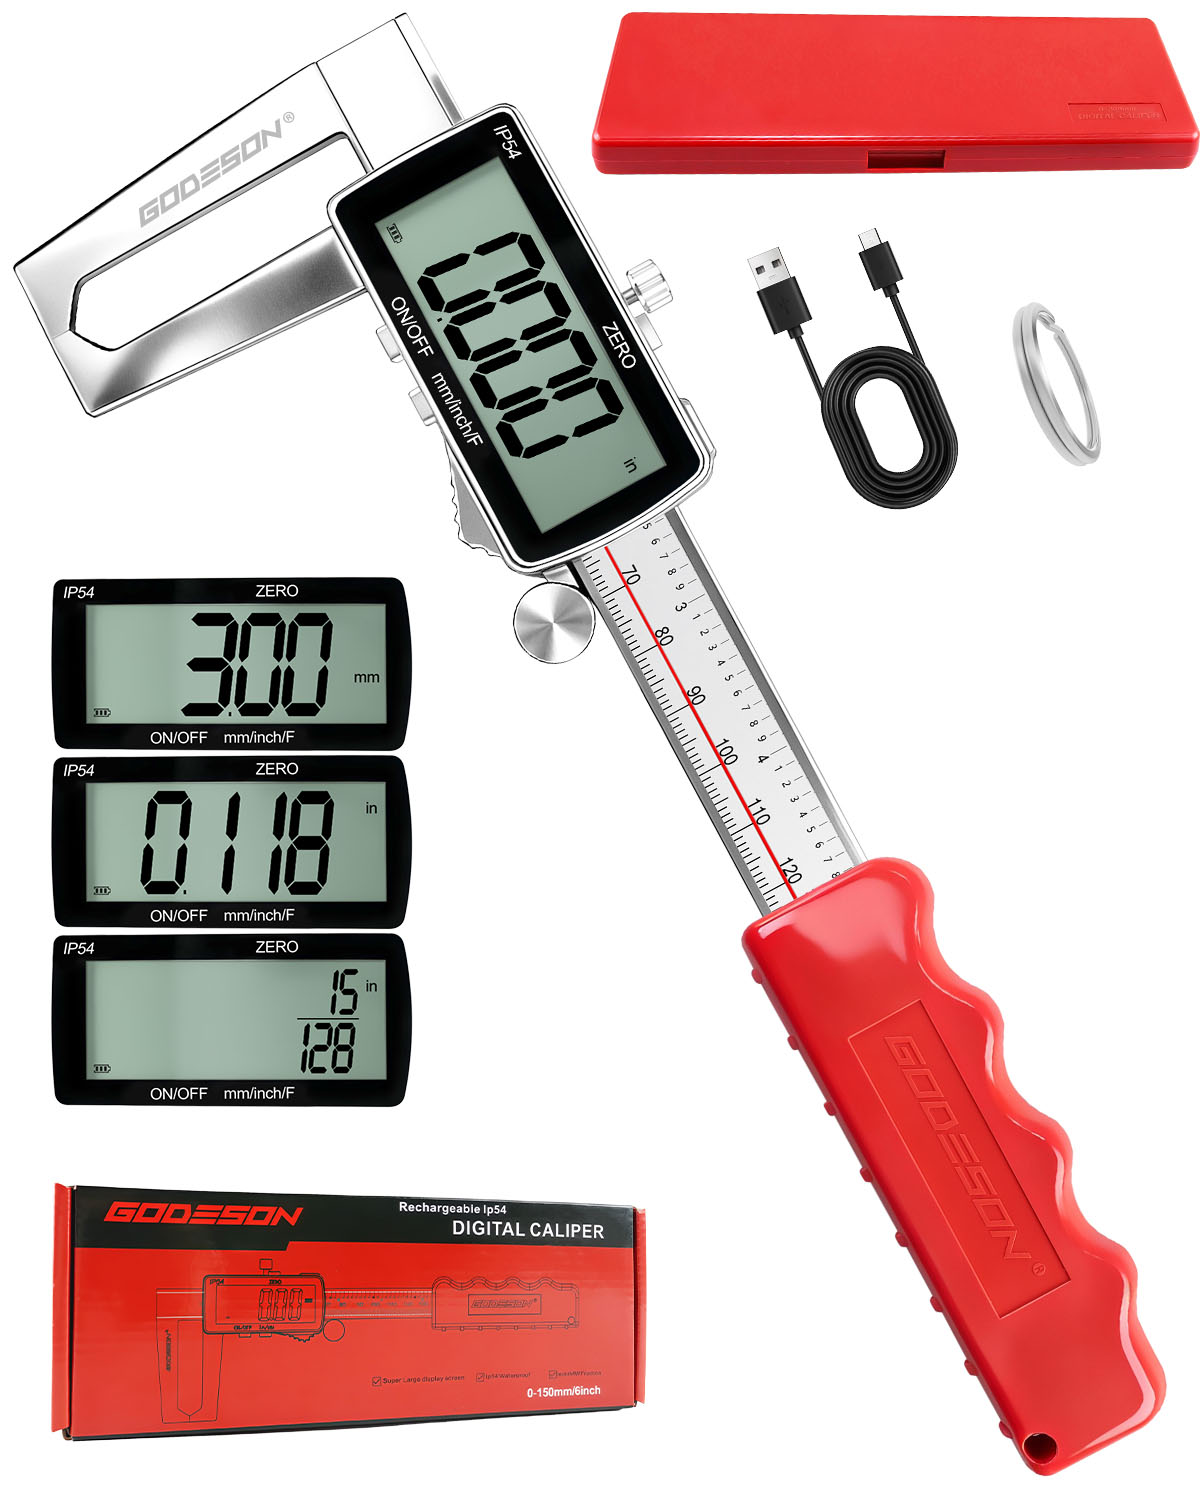
A GODESON Digital Caliper sits in that useful middle ground between a quick eyeball check and a full metrology setup. For engineers, sourcing managers, and product teams, that matters because a surprising number of downstream problems start with a simple dimensional miss: a shaft that is a little too large, a pocket that is a little too shallow, a housing that fits in CAD but not in hand. A rechargeable digital caliper is not the most glamorous tool in the drawer, but it is often the one that prevents a bad part from moving too far through the process.
The appeal is straightforward. You get internal and external measurement capability, depth measurement, and step measurement in one handheld instrument, plus a digital display that reduces reading mistakes. The model described here also shows a 0–200 mm / 8 inch measurement range, metric and inch display modes, fractional inch readouts, and IP54 protection on the display side. That combination makes it useful for inspection benches, machining rooms, woodworking shops, and general production support where the job is to check dimensions quickly and move on.
What the Tool Is Built to Do
The visible structure is familiar to anyone who has worked around precision measuring tools. Stainless steel measuring jaws and a matching beam give the caliper its working surfaces, while the black LCD module provides the numeric readout. The red grip housing appears to be a molded plastic body, and there is a knurled thumb wheel for fine adjustment. A USB charging lead is shown, which is a practical sign that this is a rechargeable digital caliper rather than a disposable-battery model.
That sounds basic, but the details matter. Stainless steel jaws and beam help the tool resist the wear that comes from repeated use on metal parts, plastic components, or machined edges. The printed or etched scale on the beam is the backup to the digital screen, and on a shop floor that backup is not decoration. It gives the user a fallback if the display is hard to see or if the battery needs attention.
What Buyers Usually Need From a Caliper Like This
Most buyers are not asking for laboratory-grade metrology. They want a dependable handheld instrument that is quick, readable, and versatile enough for day-to-day checking. The GODESON Digital Caliper, based on the visible features supplied, is aimed at exactly that use case.
Here is the practical question it helps answer: does this part fit the drawing, the fixture, or the mating component without wasting time? For sourcing teams, that can mean faster incoming inspection. For product teams, it can mean simpler prototype checks during design iteration. For machinists, it can mean less guesswork when dialing in a setup.
The multi-unit display is also a real convenience. A part may be specified in millimeters, discussed in inches, or compared against a fractional shop standard. Being able to toggle between 10.00 mm, 0.393 in, and fractional inch readouts keeps the measurement conversation moving. That sounds minor until you are on a call with a supplier in another region and someone has to translate dimensions on the spot.
Where This Kind of Caliper Fits Best
This is the sort of tool that earns its place in environments where quick checks are more common than deeply certified measurements.
Machining and fabrication
A digital caliper is often used to confirm stock size, check turned diameters, verify slot widths, and inspect step features. It is not a replacement for every micrometer or gauge block, but it handles a broad set of shop tasks efficiently.
Woodworking and cabinet work
Woodworkers like digital calipers because they reduce interpretation. Reading jaws on a component, a dowel, a groove, or a panel thickness is faster than squinting at a vernier scale, especially in dim shop conditions.
Inspection and assembly support
In light inspection work, the caliper can serve as a first-pass tool for incoming parts, subassemblies, or samples. That is where a readable display and solid jaw feel are more important than bells and whistles.
DIY and maintenance
Repair technicians and serious hobbyists use calipers for everything from bearing checks to fastener identification. A rechargeable unit has a small but real convenience edge here, because it removes one more battery type from the toolbox.
Selection Criteria That Matter More Than Marketing Copy
When buyers compare digital calipers, the label on the package is rarely the whole story. A few practical points are worth keeping in view.
First, consider the measurement range. The supplied specification of 0–200 mm / 8 inch covers a wide share of common workshop needs. That is enough for many component checks without pushing into larger specialty tools.
Second, think about display clarity and reading mode. Large numeric readouts are useful, but so are sensible unit conversions. If the user constantly needs to convert between mm and inch, the tool saves time every single day. If not, the feature still reduces friction when different teams use different units.
Third, look at the physical build. Metal jaws and beam are reassuring, but the way the tool feels in hand matters too. The thumb wheel, handle grip, and overall balance can make a difference over a long inspection run. A caliper that feels awkward tends to get used less carefully, which is exactly the wrong direction.
Fourth, note the protection claim correctly. The IP54 marking suggests splash and dust resistance, not full waterproofing. That is an important distinction. A shop can be damp, oily, or dusty without being a place to ignore environmental limits. Buyers should treat IP54 as practical resistance, not an excuse to leave the tool in coolant or a washdown area.
Common Mistakes Buyers Make
The first mistake is assuming every digital caliper is interchangeable. They are not. A tool can look similar and still differ in jaw feel, display readability, housing quality, and charging convenience.
The second mistake is overbuying precision they will never use. If the real job is routine dimensional checking, the decision should focus on usability and repeatability in practice, not on abstract performance claims that may not be verified on the listing.
The third mistake is treating rechargeable electronics as maintenance-free. A USB charging lead is useful, but it does not eliminate the need to manage storage, keep the display protected, and check the tool before critical use. A dead caliper at the wrong moment is just a very expensive ruler with attitude.
The fourth is ignoring how the tool will be shared. In many plants, a caliper passes between purchasing, prototyping, inspection, and maintenance. If the interface is confusing or the display modes are fussy, people stop trusting it and start grabbing another instrument.
What the Visible Construction Suggests About Manufacturing
Based on the supplied product details, the caliper appears to combine metal and polymer construction in a fairly standard precision-tool architecture. The jaws and beam are likely made through CNC machining or stamping followed by finishing, while the body and handle appear to be injection-molded plastic. The LCD module, internal electronics, and charging interface are assembled into the housing.
That mixed construction is normal for this category. The key is not novelty; it is disciplined assembly. A digital caliper lives or dies on alignment, smooth sliding action, stable electronics, and clear scale marking. If any of those are sloppy, users feel it immediately. The tool may still function, but confidence drops fast, and in production environments confidence is half the product.
Practical Buyer Advice Before You Place an Order
If you are sourcing this type of instrument, start by matching the caliper to the actual measuring task. For prototypes and general shop use, the visible feature set is sensible. For a controlled quality lab, you would want more verified documentation than the information provided here.
Check whether the package contents are confirmed. The image shows a protective case, retail box, cable, and a small metal ring or accessory, but unless the listing explicitly guarantees those items, do not build a purchasing decision around them.
Also confirm how the tool will be stored and charged. Rechargeable tools are convenient, but only if the charging routine is simple enough that operators will actually use it. In a team environment, convenience often decides whether a tool becomes a daily standard or sits in a drawer.
Finally, remember that a caliper is a measurement aid, not an argument-ender. If the part is critical, verify with the proper gauge or calibrated inspection method for the application.
FAQ
Is the GODESON Digital Caliper suitable for workshop use?
Yes, based on the visible design and stated features, it is aimed at workshop, machining, woodworking, DIY, and general dimensional measurement.
Does it measure in both metric and imperial units?
Yes. The display examples show metric, inch, and fractional inch readouts.
Is it waterproof?
Not enough information is provided to call it waterproof. The visible IP54 marking indicates resistance to dust and splashes, which is different from full waterproof construction.
What size range does it cover?
The box indicates a 0–200 mm / 8 inch range.
A Sensible Next Step for Buyers
If your team needs a readable, rechargeable digital caliper for routine dimensional checks, this is the kind of product worth shortlisting. The core decision is not whether the tool is impressive on paper; it is whether it will be easy to use, easy to charge, and reliable enough for the way your people actually work. If those boxes are the right ones, the GODESON Digital Caliper can fit neatly into a shop or inspection workflow without much ceremony, which is usually the best compliment a measuring tool can get.





