


How to Use the ATsafepro Digital Torque Wrench Kit for Precision Fastening
In the world of mechanical work and DIY projects, achieving the right torque is essential to avoid over-tightening or under-tightening fasteners, which can lead to failures or damage. The ATsafepro Digital Torque Wrench stands out as a reliable tool for professionals and enthusiasts alike, offering digital precision that traditional wrenches can't match. This guide will walk you through everything you need to know about selecting, setting up, and using the ATsafepro Digital Torque Wrench kit effectively. Whether you're tackling automotive repairs, assembling furniture, or working on machinery, this versatile package ensures accurate results every time.
Understanding the Components of Your ATsafepro Digital Torque Wrench Kit
Before diving into usage, familiarize yourself with the ATsafepro Digital Torque Wrench kit's components. At the heart are two digital torque wrenches: the 1/2-inch drive dual-direction model with a torque range of 4 to 250 FT-LB, perfect for heavy-duty tasks like lug nut tightening on vehicles, and the 3/8-inch drive version ranging from 4 to 144 FT-LB, ideal for lighter applications such as engine work or bicycle assembly. Both feature a 72-tooth mechanism for smooth operation and an intuitive digital display that shows real-time torque readings, peak values, and presets for common settings.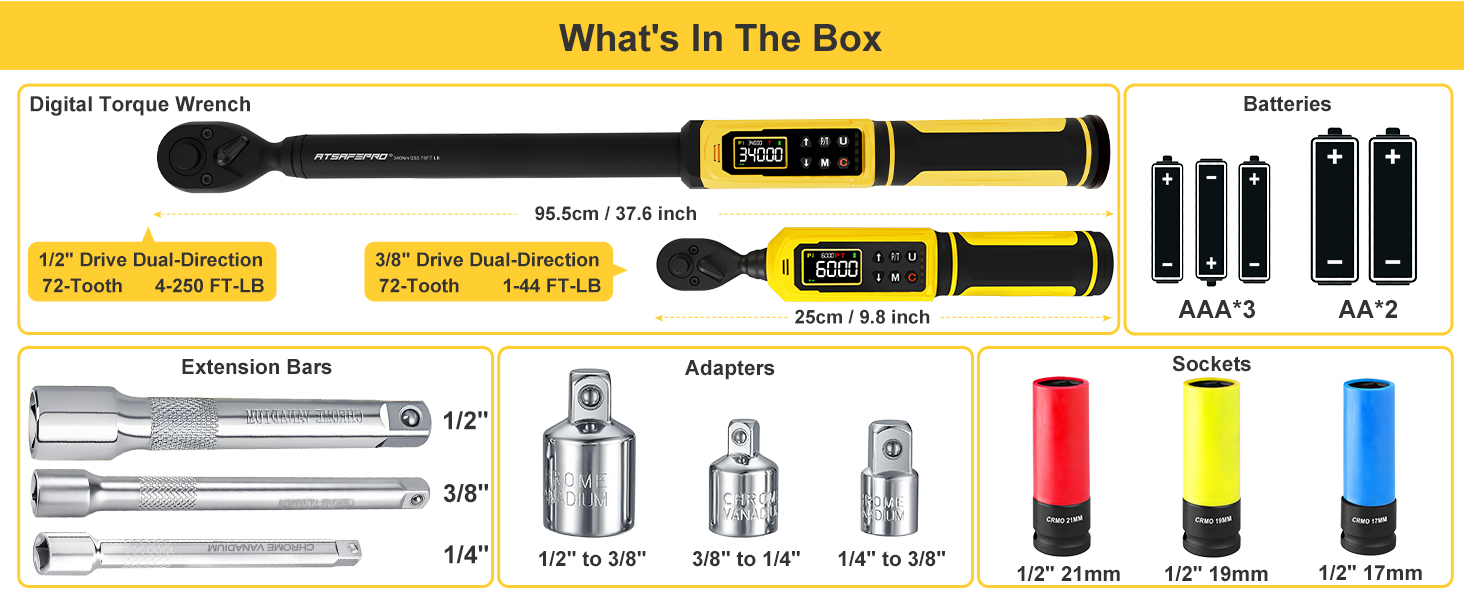
Complementing the wrenches are extension bars in 1/2-inch, 3/8-inch, and 1/4-inch sizes, made from durable chrome vanadium steel. These bars allow you to extend your reach into confined spaces without compromising accuracy. The kit also includes three adapters: one to convert 1/2-inch to 3/8-inch, another for 3/8-inch to 1/4-inch, and a third for 1/4-inch to 3/8-inch. These adapters make the ATsafepro Digital Torque Wrench compatible with a wide array of sockets, enhancing its versatility across different projects.
Additionally, you'll find color-coded sockets in 21mm, 19mm, and 17mm sizes for the 1/2-inch drive, designed for quick identification—think red for 21mm, blue for 19mm, and green for 17mm. Powering the digital features are three AAA batteries for the larger wrench and two AA batteries for the smaller one, ensuring you're ready to go right out of the box. This comprehensive setup transforms the ATsafepro Digital Torque Wrench into a complete solution for precise fastening.
Setting Up Your ATsafepro Digital Torque Wrench for Optimal Performance
To get started with the ATsafepro Digital Torque Wrench, begin by inserting the batteries. For the 1/2-inch drive wrench, slide open the battery compartment at the handle's base and insert three AAA batteries, aligning the positive and negative terminals as indicated. The 3/8-inch model uses two AA batteries in a similar fashion. Once powered, turn on the wrench by pressing the power button; the digital screen will illuminate, displaying the current mode and battery level. It's wise to check the battery indicator regularly to avoid interruptions during critical tasks.
Next, select the appropriate drive size for your job. Attach the desired socket directly to the 1/2-inch or 3/8-inch drive as needed. If working in tight spots, connect an extension bar: simply twist it onto the wrench's square drive, then attach your socket or another extension. For size conversions, use the adapters—for instance, if you need a 1/4-inch socket with the 1/2-inch wrench, secure the 1/2-inch to 3/8-inch adapter first, followed by the 3/8-inch to 1/4-inch one. Ensure all connections are snug to maintain torque accuracy.
Calibrate your ATsafepro Digital Torque Wrench before first use or periodically thereafter. Most models include a simple zeroing function: with no load applied, hold the power button for a few seconds until the display resets to zero. Set your target torque by using the up and down arrows on the handle—input your desired FT-LB value, and the wrench will beep or vibrate when reached. Choose between clockwise and counterclockwise modes for tightening or loosening, making the ATsafepro Digital Torque Wrench suitable for a variety of dual-direction tasks. Always refer to your project's specifications for the exact torque requirements to ensure safety and precision.
Step-by-Step Guide to Using the ATsafepro Digital Torque Wrench in Real Projects
Now that your tool is set up, let's apply it to a practical scenario, such as changing a car tire. Select the 1/2-inch drive ATsafepro Digital Torque Wrench for its higher torque capacity. Attach the 21mm color-coded socket using the appropriate extension if needed for clearance. Set the torque to the manufacturer's recommended value, say 80 FT-LB for standard lug nuts. Position the wrench on the lug nut, apply steady, even pressure in the clockwise direction, and watch the digital display rise. The wrench will alert you audibly and visually upon reaching the target, preventing over-torquing that could strip threads or damage wheels.
For a lighter task like assembling a bicycle, switch to the 3/8-inch drive model. Use the 17mm socket with the 3/8-inch to 1/4-inch adapter if smaller bits are required for pedals or brakes. Set a lower torque, around 30 FT-LB, and proceed slowly. The dual-direction feature shines here, allowing easy loosening if adjustments are needed. The digital interface tracks your progress, and the peak hold function lets you verify the maximum torque applied, ensuring consistency across multiple fasteners.
In more complex projects, like engine repairs, leverage the full kit's versatility. Combine extensions and adapters to access deep-set bolts— for example, use the 1/2-inch extension with the 1/2-inch to 3/8-inch adapter and a 19mm socket for cylinder head bolts. Monitor the display for any deviations, and remember to work in a well-lit area to read the screen clearly. The ATsafepro Digital Torque Wrench's accuracy, often within ±2% of the reading, makes it indispensable for tasks where precision is non-negotiable, such as aviation or manufacturing.
Maintenance and Best Practices for Longevity of Your ATsafepro Digital Torque Wrench
To keep your ATsafepro Digital Torque Wrench performing at its best, regular maintenance is key. After each use, wipe down the wrench and components with a clean, dry cloth to remove grease or debris. Store the kit in its protective case, away from extreme temperatures or moisture, which could affect the digital electronics. Avoid dropping the tool, as impacts might misalign the 72-tooth gear mechanism.
Periodically inspect the extension bars, adapters, and sockets for wear—chrome vanadium construction is robust, but cracks or corrosion warrant replacement. For the batteries, remove them if the wrench will be unused for extended periods to prevent leakage. Recalibrate the ATsafepro Digital Torque Wrench every six months or after heavy use, following the user manual's guidelines. This ensures ongoing reliability.
When using the ATsafepro Digital Torque Wrench, always wear appropriate safety gear like gloves and eye protection. Start with lower torque settings for unfamiliar tasks to build confidence. By following these practices, your kit will serve you well across countless projects, delivering the precision that defines professional-grade tools. With its comprehensive accessories and user-friendly design, the ATsafepro Digital Torque Wrench elevates any fastening job from guesswork to guaranteed accuracy.
Advanced Tips and Troubleshooting for ATsafepro Digital Torque Wrench Users
For advanced users, explore the ATsafepro Digital Torque Wrench's preset modes for common torque values, saving time on repetitive tasks like wheel installations. The memory function on some models recalls previous settings, streamlining workflows. If the display flickers or readings seem off, check battery contacts for cleanliness or replace the power source—low voltage can cause inaccuracies.
Troubleshooting common issues: If the wrench doesn't beep at the set torque, verify the unit (FT-LB vs. NM) matches your needs and that the mode is correctly selected. For stubborn fasteners, apply a penetrating oil first, but never exceed the tool's maximum range to avoid damage. In humid environments, a quick dry-out of the battery compartment prevents condensation-related glitches.
Integrating the ATsafepro Digital Torque Wrench into your toolkit means fewer errors and faster completions. Whether you're a mechanic, builder, or hobbyist, this guide equips you to harness its full potential, ensuring every twist is spot-on.





